use-case · designers · figma
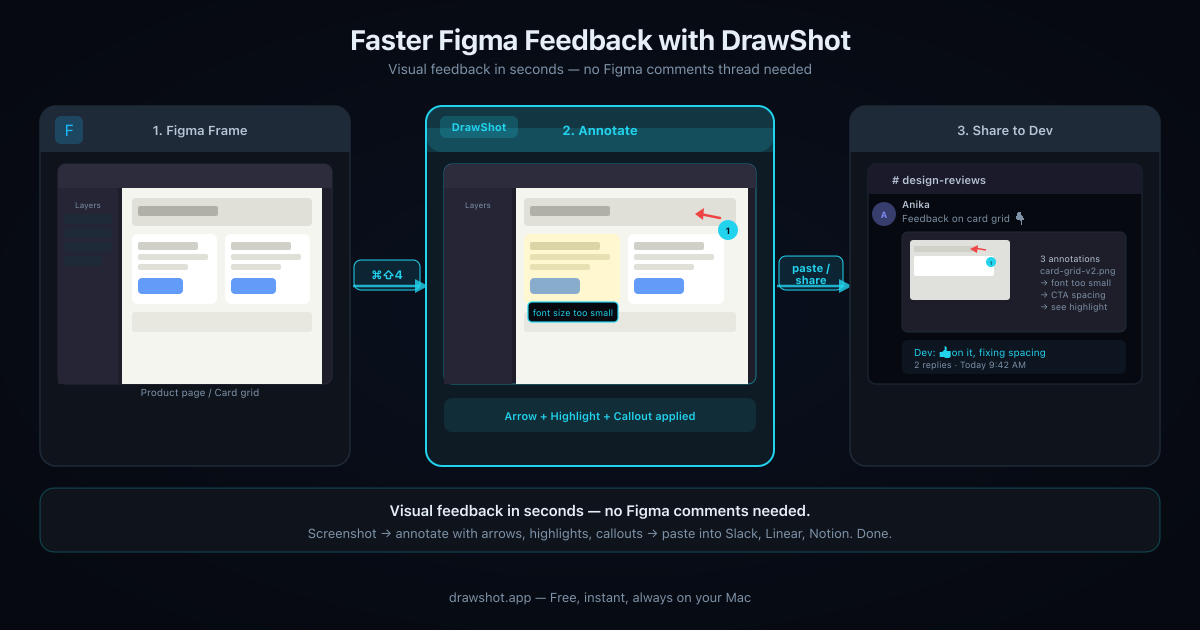
For designers: faster Figma feedback with DrawShot
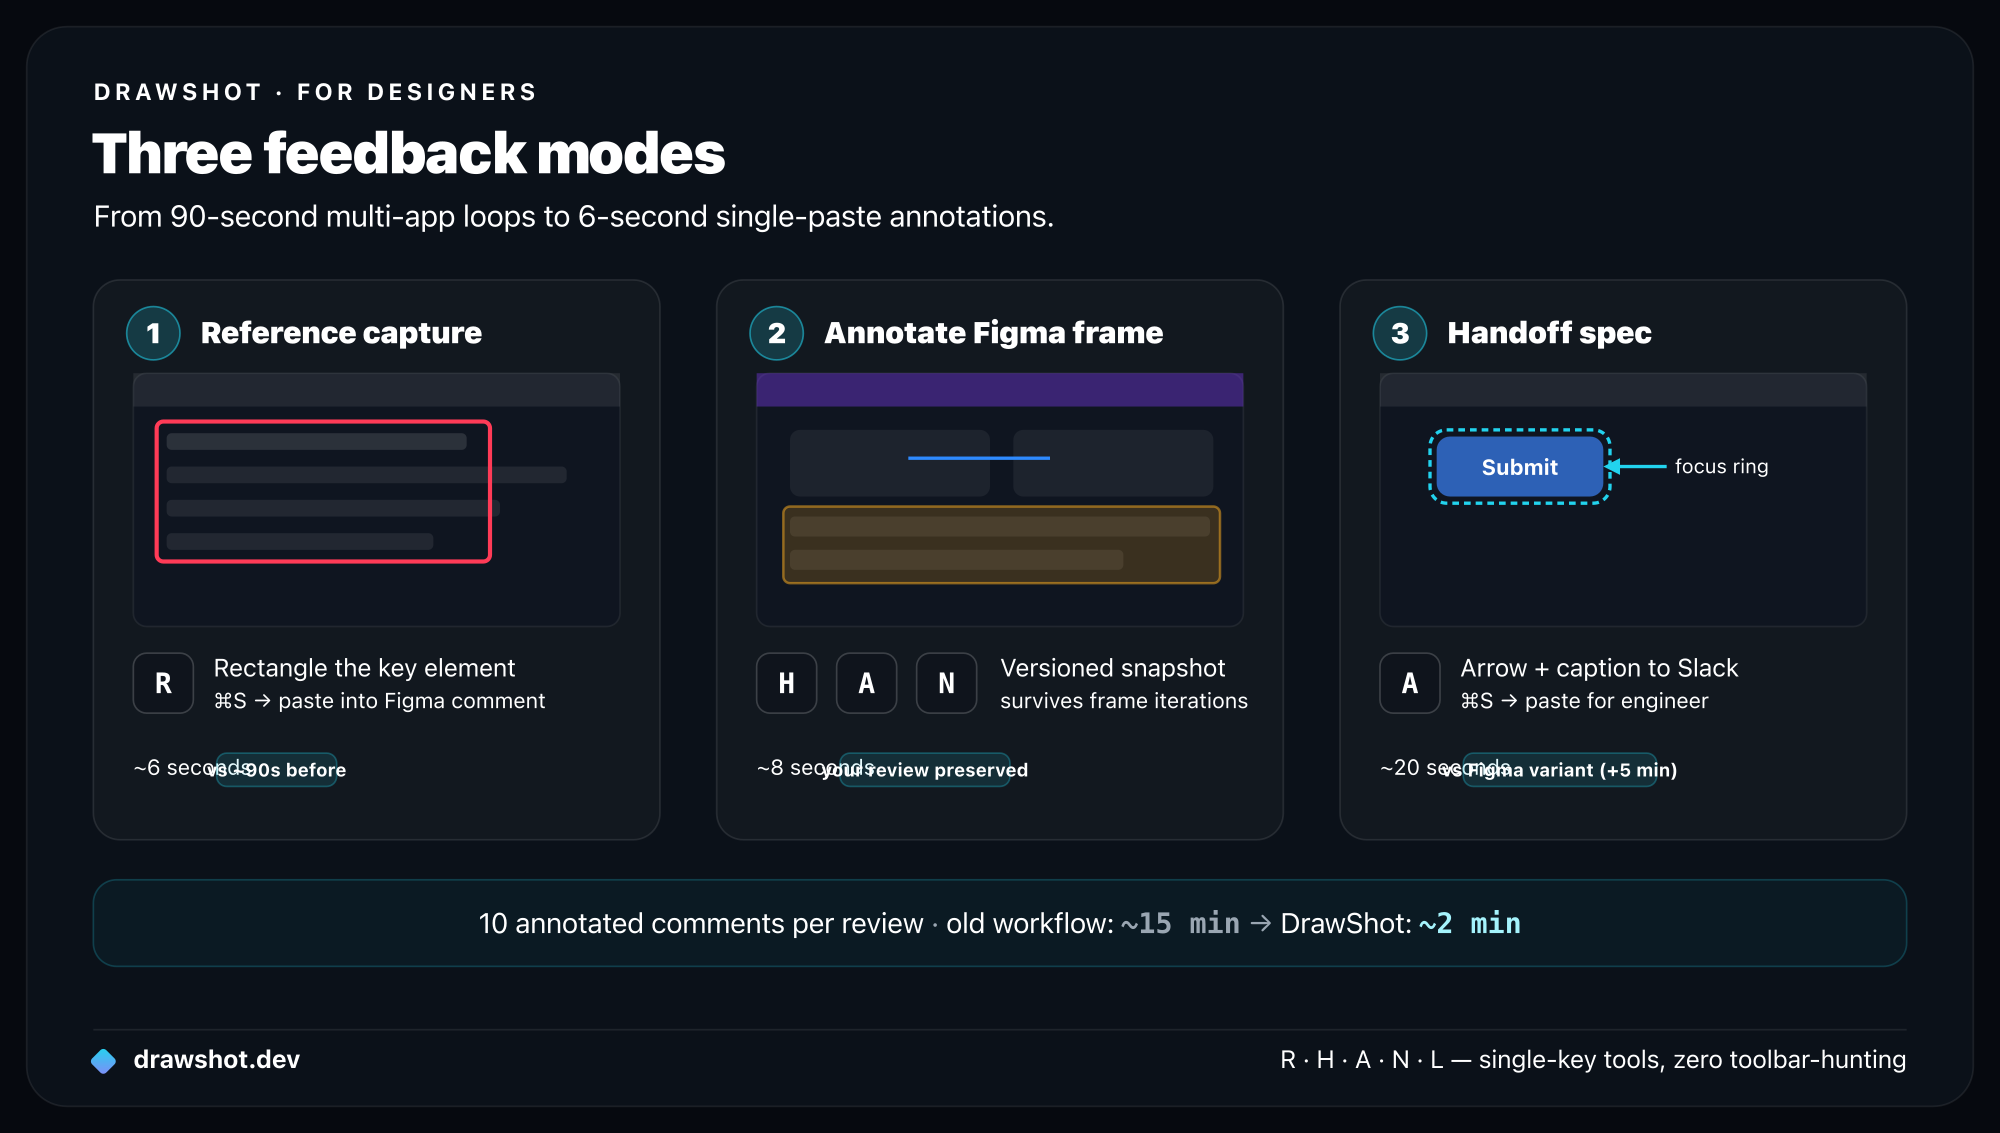
Design feedback generates ~90 seconds of overhead per annotated comment — capturing a reference, opening Preview, drawing an arrow, re-saving, re-attaching. DrawShot cuts that to ~6 seconds: ⌘⇧4 to capture, single-key tools (R/H/A/N) to annotate, ⌘S to copy, paste into Figma or Slack. Here are the three workflows that changed how I give feedback.
I'm a designer. I spend a lot of time in Figma, both producing work and reviewing other people's. Feedback is the bottleneck — not the design itself, but the coordination of leaving comments, sharing references, and capturing context from outside Figma.
DrawShot has reshaped my feedback workflow in three specific ways. This is the writeup.
The feedback loop today
A typical design review thread looks something like:
- Open the Figma file.
- Spot a thing that needs work.
- Leave a Figma comment ("the spacing here feels too tight").
- Realize a screenshot from a competitor would explain better.
- Switch to Chrome,
⌘⇧4the competitor. - Save the screenshot somewhere.
- Switch back to Figma, attach it to the comment.
- Realize the comment thread now has a screenshot but no annotation showing what you want to copy from the competitor.
- Re-open the screenshot in Preview, draw an arrow.
- Save again, re-attach to comment, delete the first attachment.
Maybe 90 seconds of context-switching per comment. If you leave 10 comments per review, that's 15 minutes of design-review overhead that has nothing to do with design.
What DrawShot changes
Three things specifically.
1. The "compare against this" reference capture
The most common annotation pattern in design feedback: "look at how X handles this." You capture a piece of another product, mark up the relevant element, and drop it into a comment.
DrawShot makes this fast enough to be casual:
⌘⇧4the competitor's UIRto draw a rectangle around the element worth noticing- Maybe a callout:
L, type "compare this radius" ⌘S, paste into the Figma comment
~6 seconds. The threshold for "is this worth attaching" drops dramatically. You attach more, the feedback is richer.
2. The "annotate over a Figma frame" review
For commenting on someone else's work, the Figma comment tool is fine for pointing — but a circle in Figma comments is awkward for indicating "this whole section needs work" or "I want this aligned with that."
What I do now:
⌘⇧4the Figma frame.- Use the Highlight tool (
H) for "this whole region" thoughts. - Use arrows (
A) for "this aligns to that" thoughts. - Use step numbers (
N) for "do this, then this, then this" rework plans. ⌘S, drop the annotated screenshot into the Figma comment.
The annotated screenshot survives even if the designer iterates on the frame — your comment now references the version you were reviewing, not the moving target. DrawShot's toast stack keeps all in-flight captures accessible while you work through a full review.
3. The "spec a state for the engineer" capture
The handoff capture. The designer ships a Figma file; the engineer asks "what's the focus state of this button?" The designer's options:
- Add a hover variant to Figma (correct, but slow if the design is shipped)
- Describe it in text (lossy)
- Take a screenshot of a similar pattern from another product (fast, often clearest)
DrawShot is the fast option. Capture from anywhere — a working product, a competitor, a CSS reference — annotate the part the engineer cares about, paste into Slack with one line of context. The whole exchange takes 20 seconds.
The same capture-and-annotate flow works for developers filing bug reports and QA engineers writing repros — the tools are the same, the context changes.
Patterns I see working
From three designers I interviewed for this post. Names anonymized.
Use color consistently across feedback
Pick one color for "this is wrong" (red) and one for "this is right" (blue). Use them every time across every Figma comment. Over weeks, your team starts reading the visual language without thinking — a red rectangle means "fix this," a blue rectangle means "preserve this."
Red and Blue are both preset swatches in DrawShot — click between them in the toolbar. Build the muscle memory.
The "before / after" capture pair
For redesigns: capture the current version, capture the proposed version, annotate both with blue rectangles on the better aspects of each. Paste both into the same Figma comment. The reviewer sees the comparison side-by-side without having to switch frames.
Step numbers for design QA
When reviewing a designer's prototype before it ships:
- Capture the prototype frame
- Drop step numbers (
N) at every interactive element - Add a small text caption for each ("hover should reveal the menu", "tap should expand", etc.)
One image, six step numbers, comprehensive review. Saves having to leave six separate Figma comments.
Blur generously on user research captures
If you screenshot anything from a user research recording — Zoom, Lookback, Maze — blur the participant's face and any visible PII. The blur tool (B) handles this in two seconds. Don't share research captures without it; you'll regret it the first time something gets forwarded.
DrawShot is local-only with no telemetry — nothing leaves your Mac unless you explicitly paste and send it.
For higher-stakes redaction (legal, partnership reviews), Export → "Flatten with redaction" replaces blurred pixels with solid black before the file is written.
Highlight for typography critiques
When the issue is type — line height, kerning, hierarchy — the Highlight tool (H) is the right primitive. Drag a semi-transparent amber over the affected text, paste into the comment. The reviewer's eye goes to the highlighted text immediately, no description needed.
The Figma comment vs. external screenshot question
A real tension in design feedback: Figma comments are attached to a specific element. They follow the design as it changes. External screenshots are a one-time snapshot.
When to use which:
- Figma comment, no screenshot: "the copy is too long" — text-only critique on the element.
- Figma comment + Figma's built-in markup: "the spacing here looks tight" — visual but contained.
- Figma comment with attached DrawShot annotation: "I want this to feel more like [external reference]" — pulls in context that doesn't live in the file.
- Slack with DrawShot annotation: "in the file you sent earlier, this section needs rework" — when the conversation needs to leave Figma.
DrawShot is best at the third and fourth. Don't replace Figma's comment system with it; layer it on top.
Specific examples from my own week
Last week, three places DrawShot saved me significant time:
Tuesday — copy review. Reviewed marketing copy on a partner's landing page. Captured 4 sections of their page, used red rectangles for "feels too long" and blue rectangles for "this works." Pasted all four into a single Slack message with brief notes. The marketing lead's reply: "this is the most useful copy review I've gotten in months." Total time spent: ~3 minutes for what would have been a 15-minute Loom video.
Wednesday — engineer handoff. Engineer asked "should the toast slide in from the right or the bottom?" I captured three different products' toast animations as stills, dropped arrows on the slide direction in each, and sent the comparison in 90 seconds. Decision made before lunch.
Friday — design review for a junior designer. Captured 6 of their frames, dropped step numbers on each issue, added one-line text captions. Sent as a single doc-style review. They told me it was clearer than reading 6 separate Figma comments.
What DrawShot doesn't help with
To be honest about the boundaries:
- Live design collaboration. Figma's own tools are better for real-time coediting.
- Spec generation. Use Figma's inspect mode or a real handoff tool.
- Long-form design critique. A written review with embedded images is sometimes better than scattered captures.
DrawShot is the pipe between "design lives in Figma" and "feedback lives in conversations." It's useful when feedback needs to cross between the two.
Wrap
The 90-seconds-per-comment overhead I described at the top adds up to about an hour a week for me. DrawShot has cut it to maybe 15 minutes a week. That's 40+ hours a year of design-review time back.
The annotations are also better — more deliberate, more consistent, easier to read — because the friction is gone. When you don't have to budget 90 seconds for each annotated comment, you annotate the ones that matter and skip the throwaway "looks fine" comments.
Frequently asked questions
How do you give faster Figma feedback with screenshots? ⌘⇧4 the Figma frame, annotate with DrawShot's single-key tools (R for rectangle, H for highlight, A for arrow, N for step numbers), then paste into the Figma comment. The whole loop is ~6 seconds versus 90 with Preview. The annotated screenshot stays tied to the version you reviewed — not the moving target of the live Figma frame.
Can I annotate over a Figma screenshot on Mac? Yes. ⌘⇧4 captures the Figma frame, then DrawShot's overlay annotator opens immediately. R draws a rectangle, H highlights a region, A draws an arrow, N drops step numbers. ⌘S copies the annotated result to clipboard — paste directly into Figma's comment field or Slack.
How do designers share redacted user research screenshots? Use DrawShot's Blur tool (key B) over any participant face, name, or PII before sharing. For higher-stakes redaction, Export → "Flatten with redaction" replaces blurred pixels with solid black so the original data never reaches the file.
Download DrawShot — free — no account, no telemetry, macOS 13+.
— Shraddha
drawshot.dev · v1.0 · macOS 13+ · free
— Shraddha Mittal
Related reading