how-to · privacy
How to Blur a Screenshot on Mac (Redact Fast)
TL;DR: To blur a screenshot on Mac fast, open it in DrawShot, press B for the Blur tool, drag a box over the sensitive area (a password, API key, email, or face), and press ⌘S — that saves an annotated PNG to disk and copies it to your clipboard in one keystroke. macOS Markup has no real blur tool, so natively you'd cover the area with a solid shape instead. Whichever you use, reopen the exported file and confirm nothing readable is left.
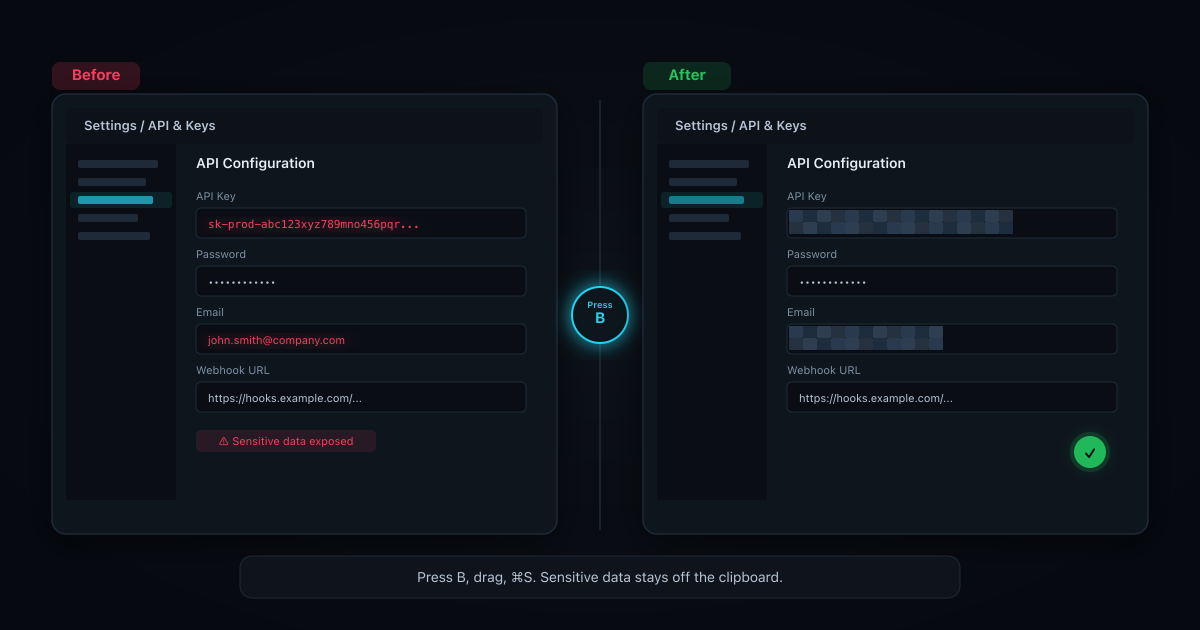
You're about to paste a screenshot into Slack, a ticket, a doc, or a tweet — and there's a password, an API key, an account number, a customer email, or a face in the frame that should not ship with it. Blurring it out should take one move, not a detour into a photo editor. Below is the fast way to redact a screenshot on Mac, the native option and exactly where it falls short, and an honest safety note so your "blurred" data is actually gone.
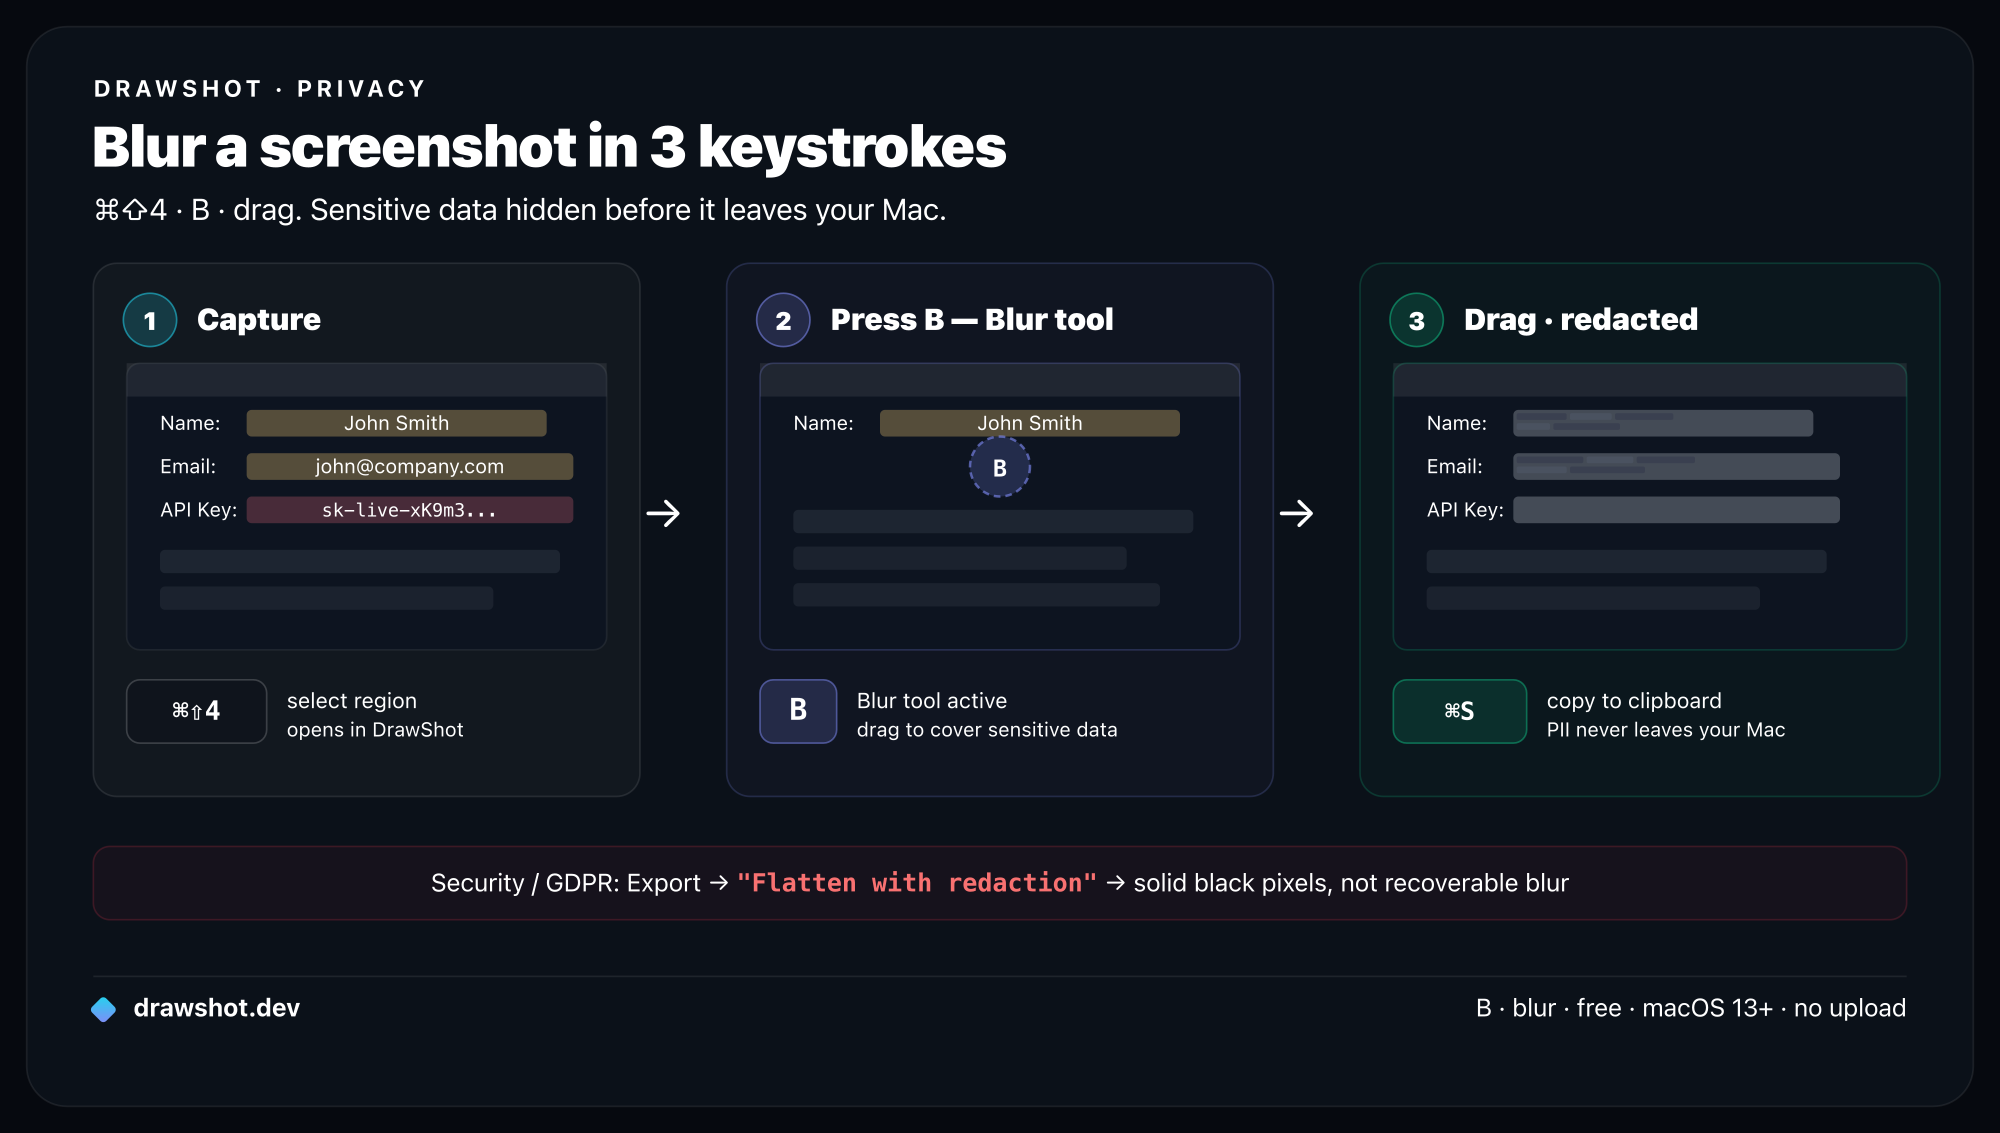
Step 1 — Capture the screenshot
Use the native macOS shortcuts you already know:
⌘⇧4— drag to grab a region.⌘⇧4then Space — click a single window.⌘⇧3— the whole screen.⌘⇧5— the screenshot toolbar with more options.
By default macOS drops the file on your Desktop. If DrawShot is running, it watches the Desktop and pops a small toast in the top-right corner the instant the file lands — click it and you're already in the editor, no extra hotkey to learn.
Step 2 — Press B for the Blur tool
DrawShot has 11 single-key tools, and Blur is one tap away: press B. No mousing to a toolbar, no menu diving. (The full set: Draw D, Arrow A, Rectangle R, Circle O, Highlight H, Eraser E, Stamp S, Blur B, Crop C, Callout L, Step numbers N.) The annotation tools guide walks through each one.
Step 3 — Drag over the sensitive area
With Blur active, drag a box over exactly what you want hidden — the API key, the password field, the email address, the account number, the face. Want more coverage? Drag a bigger box or lay down a second pass over the same spot for a heavier obscure. Cover a little extra margin around the text so no partial characters peek out at the edges.
Repeat for every sensitive region in the shot. Each drag is independent, so you can redact three different fields in three quick drags.
Step 4 — Press ⌘S to save (and copy)
When the sensitive bits are covered, press ⌘S. In one keystroke DrawShot:
- Saves the annotated PNG to disk, and
- Copies that same redacted PNG to your clipboard.
So you can immediately ⌘V it into Slack, a Jira ticket, an email, or a doc — no separate "copy" step, no hunting for the file. From capture to a clean, redacted paste is a few seconds.
The native macOS option (and its limitation)
You can do a version of this with what's already on your Mac — but with a real catch.
Open the screenshot in Preview (double-click it) or click the screenshot thumbnail to enter Markup. Then click the Markup (toolbox) icon. You'll find sketch, shapes, text, a highlighter, and a magnifier loupe.
Here's the limitation: macOS Markup and Preview have no true blur or pixelate tool. There is no "blur this region" button. Your only real option to hide something is to draw a filled rectangle over it — pick the rectangle shape, set the fill to a solid color, and cover the data.
That works, but it's fussier than it sounds:
- A shape with partial opacity still leaks what's underneath — set the fill fully opaque.
- It's easy to leave the box a hair too small, so a character or two pokes out.
- The highlighter is not redaction — it's translucent on purpose, so text stays readable through it.
If you only redact a screenshot once in a blue moon, a solid black Markup box does the job. The moment it's a daily task — support, QA, bug reports, anything where you share screens with secrets in them — a one-key Blur is a different category of fast.
A safety note worth reading before you hit share
This part matters, so it's worth being precise rather than reassuring.
Weak blur and light pixelation can sometimes be partially reversed. A low-radius blur — or coarse pixelation — over short, predictable text (a number, a fixed-format token, an email at a known domain) can occasionally be reconstructed by software, because the original pixels still influence the blurred ones. This is a documented risk, not a hypothetical. The thinner the obscuring, the more recoverable it is.
So, depending on how sensitive the data is:
- For truly sensitive data — passwords, API keys, secret tokens, full account or card numbers — prefer a strong, heavy blur or, safest of all, a solid opaque box over the region. A solid box leaves nothing of the original to reconstruct.
- Always verify the exported file. Open the saved PNG (not the editor preview) and confirm there's genuinely nothing readable under your redaction. Zoom in. This single check catches almost every "oops, you could still read it" mistake.
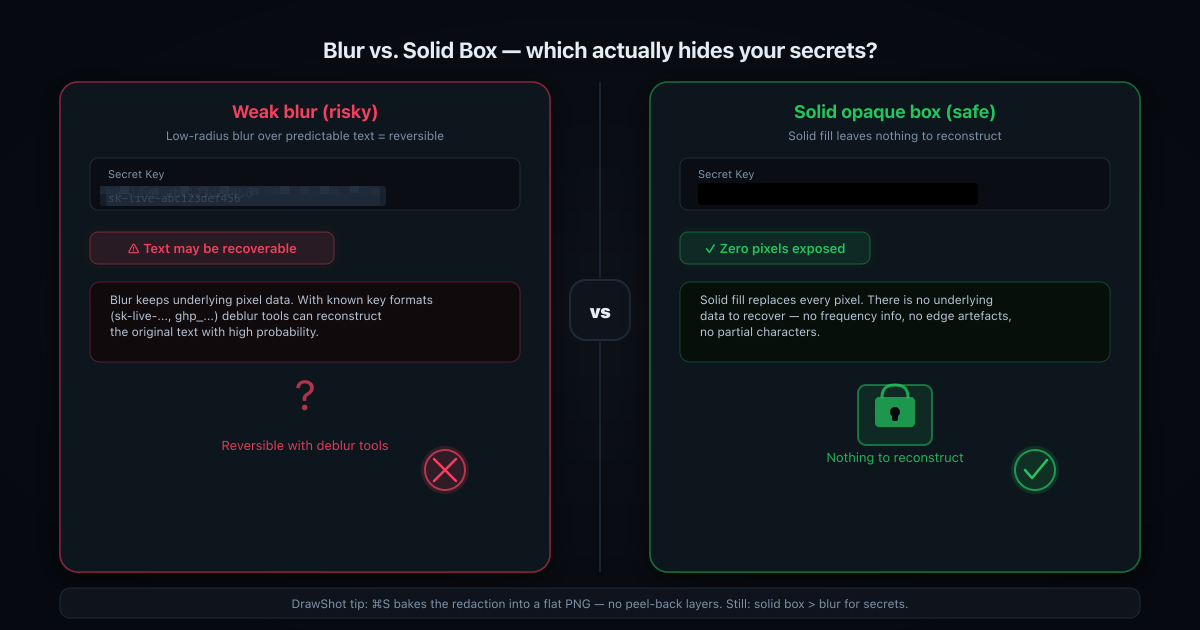
Where DrawShot helps: when you press ⌘S, it flattens every annotation into the exported image — the saved PNG is a single layer with your blur or box baked in, so the covered pixels are replaced in the file you actually share, not parked on a separate, peel-back-able layer. That removes the most common leak (handing someone a layered file they can move the box off of). It is not a cryptographic guarantee, though: a light, low-radius blur baked into a flat PNG can still be weak. The honest rule stands — strong blur or a solid box for real secrets, and check the exported file. If you care why a tool keeping your screenshots entirely on your machine matters for this, see why DrawShot is local-only.
Why DrawShot fits this job
Redaction is a privacy task, so the tool you use to do it shouldn't be quietly uploading your screenshots somewhere. DrawShot is 100% local — no cloud, no telemetry, no account, no analytics. The sensitive screenshot you're blurring never leaves your Mac. It's about 22MB, runs menu-bar only, and needs macOS 13+.
It also rides the native capture shortcuts (⌘⇧4, ⌘⇧3, ⌘⇧5) instead of replacing them, watches your Desktop, and pops that Loom-style toast on every capture — so the redact-and-paste loop sits right on top of the workflow you already have. The core annotator is free; a Pro tier ($9/year) is coming for OCR and AI extras, but redaction lives in the free core.
If you also label and mark up shots, the how to annotate a screenshot on Mac guide covers arrows, text, and shapes the same one-key way. And the full keymap is in the annotation tools reference.
FAQ
How do I blur part of a screenshot on Mac?
The fastest way is a dedicated tool: capture with ⌘⇧4, open the shot, press B for the Blur tool, drag a box over the sensitive area, then press ⌘S to save. macOS Markup has no true blur — you'd cover the area with a solid shape instead. Either way, open the exported PNG and confirm nothing readable is left.
Does macOS have a built-in blur tool for screenshots?
No. macOS Markup and Preview have shapes, text, a highlighter, and a magnifier loupe, but no dedicated blur or pixelate tool. To hide something natively you draw a filled rectangle over it. For real blur or one-key redaction you need a third-party app like DrawShot (press B).
Can blurred text in a screenshot be un-blurred? Sometimes. A weak, low-radius blur or light pixelation over short, predictable text (numbers, known formats) can be partially reversed by software. For anything truly sensitive — passwords, keys, account numbers — use a strong blur or, safer, a solid opaque box, and always check the saved file.
What's the safest way to redact sensitive info in a screenshot?
Cover the data with a solid, opaque box rather than a light blur, then export and reopen the file to verify the pixels underneath are gone. In DrawShot, ⌘S flattens every annotation into the saved PNG, so the covered area is replaced in the exported image — not hidden on a separate layer.
Blurring a screenshot should be a one-key habit, not a chore you skip when you're in a hurry. Download DrawShot free and the next time a password or key is sitting in your capture, it's B, drag, ⌘S — done, and private. Curious about the paid extras? See pricing.
DrawShot — free macOS screenshot annotator
Annotate your first screenshot in under 30 seconds. No account, no signup.
— Shraddha Mittal
Related reading