how-to · macos
How to Annotate a Screenshot on Mac (Free, Native)
TL;DR: To annotate a screenshot on Mac for free, take the shot with ⌘⇧4 (region) or ⌘⇧3 (full screen), then click the floating thumbnail that appears in the bottom-right corner to open Markup — add arrows, text, shapes, and highlights, then save. Already have the image saved? Open it in Preview, click the Markup toolbox icon, mark it up, and save. Both tools are built into macOS and cost nothing.
macOS has had genuinely capable annotation built in for years now. If you only mark up a handful of screenshots a day — circle a button, drop in an arrow, type a quick note — you do not need to install anything. Below are the two native methods that cover almost every case, written as clear step-by-step instructions, plus an honest look at where the native loop starts to slow you down if you annotate screenshots all day.
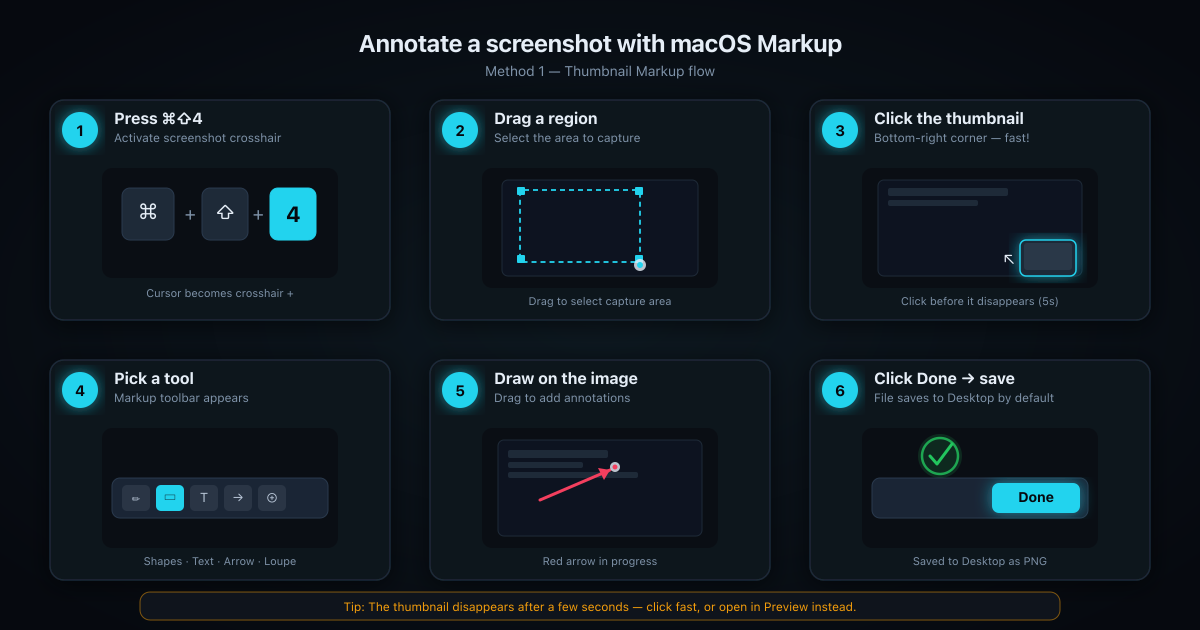
Method 1: Markup from the screenshot thumbnail (fastest native way)
This is the quickest way to mark up a screenshot on Mac, because it skips opening any app. When you take a screenshot, macOS briefly shows a thumbnail in the bottom-right corner of your screen. Click it within those few seconds and you land straight in the Markup editor.
- Capture the screenshot. Press
⌘⇧4to drag a region, or⌘⇧3to grab the whole screen. (You can also press⌘⇧5to open the screenshot toolbar with more capture options.) - Click the floating thumbnail. A small preview slides into the bottom-right corner for a few seconds. Click it before it disappears — that opens the screenshot directly in Markup.
- Pick a tool. The Markup toolbar gives you sketch, shapes, text, signature, and shape-style controls. Click Shapes for a rectangle, oval, line, or arrow; click the Text button (the T) to type a label.
- Draw or type on the image. Drag to place a shape, or click to drop a text box and start typing. Reposition anything by dragging it.
- Style it. Use the shape-style, border-color, and fill controls to set the color and line thickness so your arrow or box actually stands out against the screenshot.
- Save or share. Click Done to commit the markup. The annotated screenshot saves to your Desktop (or wherever your screenshots go), ready to drag into a message, doc, or ticket.
If the thumbnail vanishes before you click it, no problem — the screenshot is already saved to your Desktop. Jump to Method 2 and open it in Preview instead.
Tip: If you don't see the floating thumbnail at all, open
⌘⇧5, click Options, and make sure Show Floating Thumbnail is checked.
Method 2: Preview's Markup tools
Preview is the workhorse for annotating any image you've already saved — a screenshot from earlier, a photo, a diagram someone sent you. It carries the full Markup toolkit and a bit more room to work than the quick thumbnail editor.
- Open the image in Preview. Double-click the screenshot, or right-click it and choose Open With → Preview.
- Show the Markup toolbar. Click the Markup icon in the toolbar — it looks like a toolbox / marker tip. (If you don't see it, go to Tools → Annotate, or View → Show Markup Toolbar.)
- Choose your annotation. Preview offers sketch, draw, shapes, text, speech bubble, highlight, and signature. Click the one you need.
- Add it to the screenshot. Draw a freehand circle around a button, drag a rectangle, drop an arrow, or click Text to type a label. Use Sketch for rough freehand and Draw for cleaner lines that Preview snaps into shape.
- Set the style. With a shape selected, use the shape-style, border-color, and fill menus to control thickness and color. A red arrow on a light UI reads instantly; a thin gray one disappears.
- Save your work. Press
⌘Sto save over the file, or File → Export to write a copy. To protect the original, duplicate it first (File → Duplicate) and annotate the copy.
The caveat nobody mentions: you usually can't edit annotations after saving
This trips people up constantly, so it's worth stating plainly. Once you save Markup annotations onto a non-PDF image (a PNG or JPG screenshot), they're flattened into the pixels. Reopen the file later and you can't select, move, recolor, or delete that arrow — it's just part of the picture now. Your only fix is to undo before saving, or start over from a clean copy.
Two ways to stay safe:
- Keep the original. Duplicate the screenshot before you mark it up, so you always have an unedited version to fall back on.
- Use PDF when edits need to stay live. Annotations on a PDF in Preview remain selectable and editable after saving. For screenshots, that usually means exporting to PDF first — workable, but clunky.
The native annotation tools, briefly
Across both Markup and Preview you get the same core set, and it covers a lot:
- Sketch & Draw — freehand lines; Draw cleans up your shapes automatically.
- Shapes — rectangle, oval, line, and arrow, plus a loupe to magnify part of the image.
- Text — typed labels with font, size, and color controls.
- Speech bubble — a callout for pointing at a specific spot (Preview).
- Highlight — emphasize an area.
- Signature — drop a saved signature, mostly for documents.
- Shape style & colors — line weight, border color, and fill.
For occasional markup, this is honestly all you need. Native macOS earns its keep here.
Where the native loop breaks down
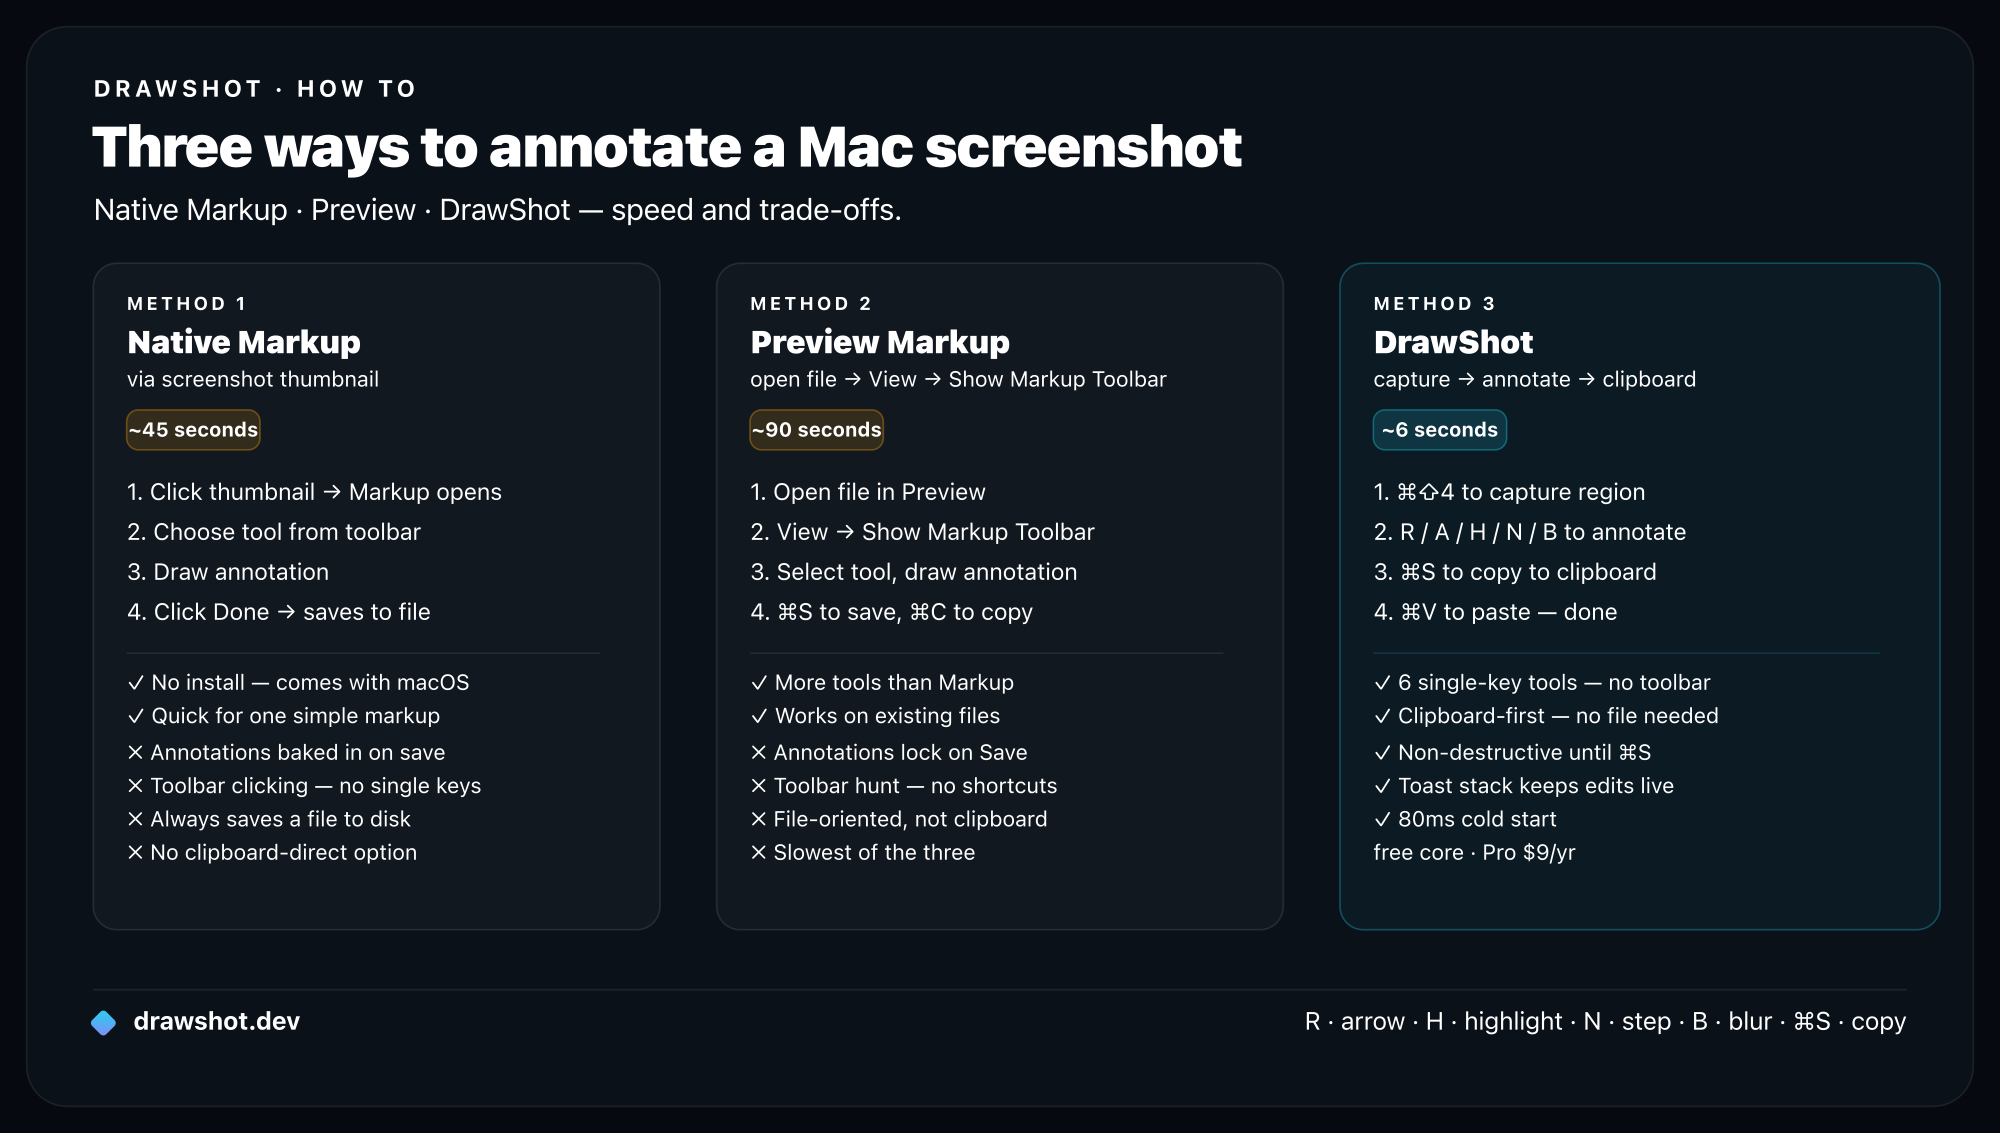
Native Markup is fine for a few screenshots. The friction shows up at volume — when annotating screenshots is something you do dozens of times a day, not a few times a week.
Walk through the actual native loop: capture → wait for the thumbnail (or hunt down the saved file and open Preview) → find the Markup toolbar → mouse over to the tool you want → drag → mouse to the style menu to fix the color → save → then go find and attach the file. Every tool lives behind a mouse move or a modifier key. There are no single-key tools — you can't tap a key to switch from arrow to blur to text. There's no persistent stack of recent shots to flip between. And there's no save-and-copy in one keystroke: saving the file and getting it onto your clipboard to paste are separate actions.
None of that matters at five screenshots a day. At fifty, those small frictions stack into real minutes — and a real reason to break your flow. If that's you, here's what changes.
A faster workflow when you annotate all day: DrawShot
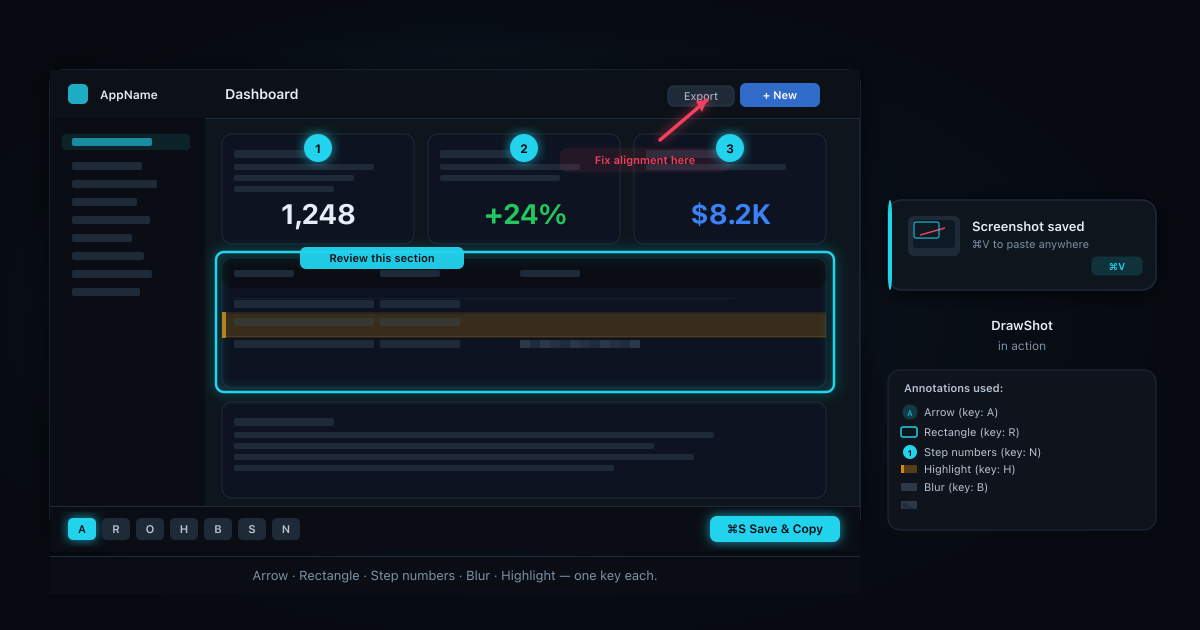
If marking up screenshots is a core part of your day — bug reports, design feedback, QA, support replies, docs — the native loop's per-screenshot overhead adds up. DrawShot is a fast, private, keyboard-first annotation app built for exactly that bracket. It doesn't replace ⌘⇧3/4/5; it sits on top of them.
DrawShot watches your Desktop, so any native ⌘⇧3, ⌘⇧4, or ⌘⇧5 capture instantly pops a toast in the top-right corner. Click it and you're annotating — no new hotkey to learn, no thumbnail to race against. From there:
- 11 single-key tools: Draw (
D), Arrow (A), Rectangle (R), Circle (O), Highlight (H), Eraser (E), Stamp (S), Blur (B), Crop (C), Callout (L), and Step numbers (N). Tap a key, you're on that tool. No mousing to a toolbar. ⌘Ssaves and copies in one keystroke — to~/Pictures/DrawShot/and your clipboard at once, ready to paste into Slack or a ticket. No separate copy step.- A persistent toast stack keeps every screenshot from your session; click any one to reopen it. It's disk-backed, so it survives a crash.
⌘Zundo, 4 colors plus a wheel, and 3 line weights — the styling lives under your fingers instead of behind a menu.- 100% local. No telemetry, no account. It's about 22MB, runs menu-bar only, and needs macOS 13+.
Native Markup vs. a dedicated tool
| Native Markup / Preview | DrawShot | |
|---|---|---|
| Steps to annotate | Capture → wait for thumbnail or open Preview → find toolbar → save → attach | Capture → click toast → annotate → ⌘S |
| Single-key tools | No — mouse/modifier-driven | Yes — 11 single-key tools |
| Save + copy in one keystroke | No (separate actions) | Yes — ⌘S saves and copies |
| Persistent history of recent shots | No | Yes — disk-backed session stack |
| Cost | Free, built into macOS | Free core; Pro $9/year (coming) for OCR, AI Summarize, and capture history |
DrawShot's free core is free — the everyday annotation workflow above costs nothing. A Pro tier ($9/year, coming) adds OCR/image-to-text, AI Summarize, and capture history on top for people who want more.
For the deeper dive on each tool, see the annotation tools guide and the keyboard shortcuts reference. If you're weighing your options more broadly, ⌘⇧4 isn't enough covers exactly when native runs out of road, and the best screenshot tool for Mac compares the field.
FAQ
How do I annotate a screenshot on Mac for free?
Take a screenshot with ⌘⇧4 or ⌘⇧3, then click the floating thumbnail that appears in the bottom-right corner to open Markup. Or open the saved image in Preview and click the Markup (toolbox) icon. Both are built into macOS at no cost and let you add arrows, text, shapes, and highlights.
Can I edit annotations after saving a screenshot? On a regular image (PNG or JPG), no — once you save, annotations are flattened into the picture and can't be moved or removed. To keep edits adjustable, work in PDF format, keep an unmarked copy of the original, or use a tool with a persistent, re-editable annotation stack.
What's the fastest way to mark up screenshots on Mac?
The fastest native route is Quick Markup: capture with ⌘⇧4, then click the thumbnail in the corner before it disappears to jump straight into the editor. If you annotate dozens of shots a day, a dedicated tool with single-key tools and a save-and-copy keystroke is faster still.
How do I add an arrow or text to a Mac screenshot? Open the screenshot in Markup (from the thumbnail) or Preview, click the Shapes button for an arrow, or the Text button (the T) to type a label. Drag the arrow into place and use the style controls to set color and thickness, then save.
Native Markup will carry you a long way, and for occasional use it's the right call. But if you find yourself annotating screenshots all day, give DrawShot a try — it keeps the native captures you already use and makes the marking-up part fast.
DrawShot — free macOS screenshot annotator
Annotate your first screenshot in under 30 seconds. No account, no signup.
— Shraddha Mittal
Related reading